
If you enjoy HunterPie and want to support its development, consider supporting on Patreon!
HunterPie is an overlay for Monster Hunter games, it displays useful in-game information that are not visible to the player such as monster health, damage done, time left on your buffs and debuffs and some weapon-specific data.
In order for it to work, it needs to get those values from somewhere, in this case, from the game process’s memory itself! The thing is, messing with closed source software isn’t really straightforward, depending on how a process was compiled and which language it was made on, the human readable part code is completely removed from the binaries, you won’t have the class, structs, function and method names, it will be just a bunch of bytes, offsets and instructions. This article will be split up into 2 topics, the reverse engineering and HunterPie’s architecture.
The Reverse Engineering
Reverse engineering is an arduous and time consuming, although fun, process. A big part of it is to assume things, I’m not a game developer myself but as a software engineer you can have a pretty good idea on how things are implemented.
For instance, what is the first thing that comes in mind when you think of a health value? Probably a number, those can be usually implemented using integers or floating point decimals, in the case of Monster Hunter World, that was implemented using a float type.
It is important to note that in order to assume things, you also need to understand the basics of data types and data structures. For example, how would the following data structure look like in memory in a x64 game?
1
2
3
4
5
struct Player {
    float health;
    float maxHealth;
    char* name;
};
It would look like the following:

The other important part of reverse engineering is to understand at least the basics of what happens when a program is compiled down to native machine code, what is the stack memory? The heap? If you wrote a code that access a field in a class, what would that look like in assembly? All that is important to know before diving into how HunterPie works exactly and I’ll be explaining those concepts since they’re really important.
Types, Structures & Classes
Monster Hunter World is written in C++ and follows the OOP concepts, which means there are a lot of abstract classes, inheritance, etc.
Types
Memory is just a contiguous and really big array bytes, knowing all the primitive types is really helpful because that’s how you’re going to be able to map the structures by hand, for instance, the following little endian hex value 00 00 80 3F is the float32 value for 1.0, but if you tried to read it as an int, it would represent 1065353216. Depending on how you read the bytes or how many bytes you are reading the value can change drastically. When I look at the memory, deducing the type I’m working with is very contextual.
There are a couple of things you can look for when trying to figure out which types you’re looking at, for example, when you’re working with a float or double, those are usually stored in floating point registers (xmm0, xmm1, etc) or handled by floating point instructions like the movss. On the other hand, integers are usually stored in the QWORD registers (rax, rbx, etc).
Structures
You can think of a structure as a little box of primitive types, when you’re looking at memory you won’t be able to tell how many fields there are, or where a field starts or ends, that’s when putting breakpoints on the memory addresses with a debugger come useful. It allows you to see which instructions access that given memory address, here’s a simple example:
1
2
3
movss xmm0, [eax]
mov rbx, [rax+4]
movss xmm1, [ebx]
When looking at the previous two instructions, we can tell that rax is an structure and it has two fields, the first field is mostly likely afloat since it’s being put in a float register, the second one is a pointer since it’s being dereferenced with the offset 4, the pointer also points to another structure with a float. You could represent that as:
1
2
3
4
5
6
7
8
struct RBX {
    float value;
};

struct RAX {
    float value;
    RBX* rbx;
};
Classes
An easy way to think of classes in memory is to think of a struct, and the methods as functions where the first parameter is a reference to that struct. Consider the following class:
1
2
3
4
5
6
7
8
9
10
11
12
13
14
15
class Player {
    public:
        float GetHealth() {
            return this->m_health;
        }

        char* GetName() {
            return this->m_name;
        }

    private:
        float m_health;
        float m_maxHealth;
        char* m_name;
}
It’s safe to say that if you compiled the previous class and wanted to “transpile” the assembly code to something more human readable, it would look something like this:
1
2
3
4
5
6
7
8
9
10
11
12
13
struct Player {
    float health;
    float maxHealth;
    char* name;
};

float GetHealth(Player* player) {
    return player->health;
}

char* GetName(Player* player) {
    return player->name;
}
It’s good to know these type of things because when you’re reverse engineering a procedure in assembly, if the first parameter is an 8 byte long value that is often dereferenced with offsets, there’s a pretty big chance that procedure is an implementation of a method for that given pointer, and that helps a lot when trying to understand what that procedure does.
In the case of virtual functions, things change a little bit and get more complicated, a table will be created for that class and a pointer to that table will be the first field in the structure, this was very common in Monster Hunter World, as every monster had it’s own class but they all inherited a common enemy class with virtual methods. The same class Player could be represented like this if it implemented virtual functions:
1
2
3
4
5
6
struct Player {
    void* vptr;
    float health;
    float maxHealth;
    char* name;
}
Although the vtable is generated automatically by the compiler, the dereference and calls are done in runtime, so unlike non-virtual functions that are called by their already-known relative address, virtual functions need to be dereferenced and put into a register before being called, which makes it fairly easy to tell when you’re dealing with a virtual function.
1
2
3
4
; Assuming rax is a Player*
mov rbx, [rax] ; Puts the value of vptr into the rbx register
mov rdx, [rbx] ; Puts the pointer to the virtual function into the rdx register
call rdx       ; Calls the virtual function
Memory
The process’s memory can be split up in two, the static memory and the dynamic memory. The static memory is the one that is embedded in the executable itself, the compiler is the one responsible for this one, this memory is where global and static variables are, this is very important because that’s how HunterPie (and the software itself) get to the values in the dynamic memory. The memory addresses in the static memory are always the same, unless you change something internally in the code and recompile your program.
The dynamic memory on the other hand is well… Dynamic! The addresses are never the same, those are handled by the OS in runtime whenever your software needs more memory. The heap and the stack are also part of the dynamic memory, whenever you use the keyword new or use the malloc function, it will reserve some space in the memory and give you a pointer to that address, and for local variables the stack will be used for primitive types.
The thing is, you can get to anything in the dynamic memory from the static memory, you just need the right offsets to get to your desired data, and that’s the tricky part. The process of finding the offsets from the static memory to the value you want is done backwards; First you find the value you want by scanning the dynamic memory with possible values (this is where assuming things come in) and then you put a breakpoint on the accessors of that value and look at what which instructions accesses them.
Consider the following image:
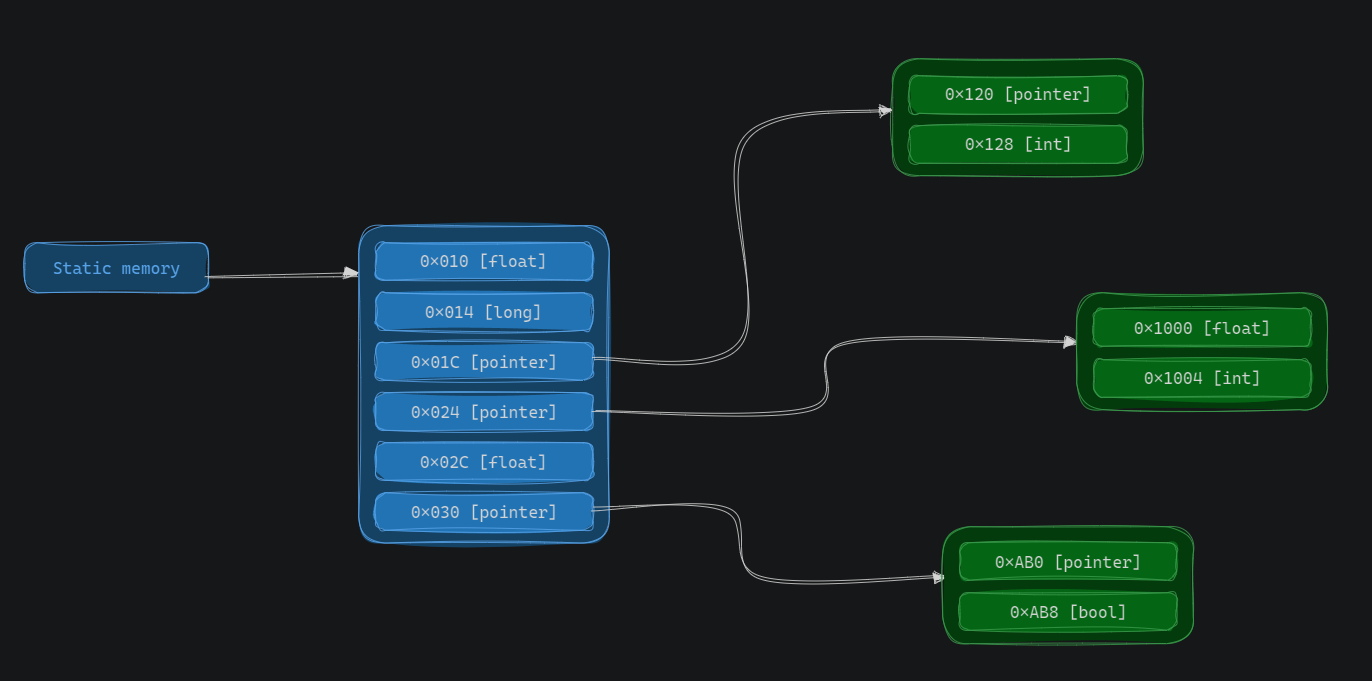
Let’s say the value you found is the second field in the Structure 3, the int one, when you put a breakpoint on it, you might get an instruction accessing a register plus the offset 4, something like this:
1
mov ebx, [eax+4] ; The instruction and registers might differ
That means the base address of our structure is 0x1004 - 4 = 0x1000, with that value you can now scan for all addresses that contains the value 0x1000, that will give you a list of all possible Structure 3 pointers.
You can now put a breakpoint on that pointer and see the instructions, that access it, it should be something like:
1
mov rbx, [rax+14h]
By doing the same process you did previously, you’ll find the static memory, now you can always get to the Structure 3’s desired field by following that “path” of offsets, you just need to dereference the static address with the offsets you found:
1
Static Memory -> (Structure 1 + 0x14) -> (Structure 3 + 0x4) -> Desired field
Dereferencing the memory values from the static memory is HunterPie’s main way to extract the data from the game, it is constantly reading the game’s memory and updating the values internally.
DLL Injection
Sometimes you want to access the process’s data that is not in memory, in Monster Hunter Rise, for example, the player’s damage is not stored in memory, so scanning the memory for them is not possible.
One of HunterPie’s core feature is to be able to track and plot the player’s damage on screen, for that to work properly I had to use another technique. Code injection and function hooks!
Injection
There are a couple of ways to inject code into other processes, but the easiest is to use Window’s kernel32. It has some very useful functions that can be used for this purpose:
- Open a handle to another process (
OpenProcess) - Allocate memory in another process (
VirtualAllocEx) - Write to another process’s memory (
WriteProcessMemory) - Load library from a path (
LoadLibraryW) - Create threads in another process (
CreateRemoteThread)
These 5 steps allow you to inject a library, you start by opening a process handle, allocating enough memory to be able to write a path to your DLL file, writing the string, finding the remote process’s LoadLibraryW address and then creating a remote thread using that LoadLibraryW as start address and the injected string as a parameter.
That will make the remote process load the library you want.
Function Hooks
Function hooks, also known as trampoline or detouring, is a very useful technique to make a process execute code whenever a built-in function is called. If you’re interested on details on this one, take a look at MinHook.
Basically it replace the first couple instructions from a procedure with a jmp instruction pointing to a relative address to where your function is, and then another jmp on your detoured function to jump back to the original instructions.
This technique allows you to execute code that receives the same parameters as the original function or even change behavior of the original function.
HunterPie
Now that you’ve seen the basics on how to extract values from another process, it’s easier to explain HunterPie’s architecture.
The application is split up in 4 modules: Core, UI, Integrations and HunterPie itself.

- Core: Contains the application domain entities, this includes common interfaces, configuration definitions, event models, and services that can be used by other modules.
- Integrations: This is the module that handles the logic for scanning each game, it’s responsible for implementing the interfaces that are on Core.
- UI: As the name implies, it’s the module responsible for UI related things such as visual controls, data converters, views and view models. The UI module is agnostic to the game integrations which makes the overlay components fully reusable independently of the game.
- HunterPie: This is the program itself, it is responsible to initialize all the other modules and handle internal features.
HunterPie follows an event-based architecture model, there are events for everything that have the possibility of changing. Whenever you start a supported game, a new IContext is instantiated, that interface contains ways to access player, enemies and also game data through the IPlayer, IMonster and IGame interfaces.
The previous interfaces are responsible for update values internally and also dispatch events for those values.
For example, to start receiving events of the player’s level, you can just subscribe to the OnLevelChange event.
1
2
3
4
5
6
7
8
9
10
[...]

private void SubscribeToEvents(IContext context)
{
    context.Game.Player.OnLevelChange += (source, args) => {
        Log.Info($"The player is now level {args.MasterRank}");
    }
}

[...]
Whenever HunterPie detect that the player’s level changed in-game, it will update the internal value in the IPlayer class and dispatch the event to all its subscribers.
Detecting values changes
HunterPie tracks values using two different approaches, the first one is by constantly scanning the game’s memory for static addresses and offset paths to the data it needs to works. The second one is by injecting a native library inside the game and opening a communication layer between HunterPie and the game.
Memory scanning
Every supported game has a map file containing addresses and offsets that can be used, the map file looks something like this and is loaded in runtime whenever the game starts.
1
2
3
4
5
# Addresses
Address QUEST_DATA_ADDRESS 0x506F240

# Offsets
Offset QUEST_STATE_OFFSETS 0x54 # This supports an array of integers too
Then in the scanner implementation you can fetch those values and read the memory with any type you want, this includes reading complex structures to reduce the amount of P/Invoke calls when reading multiple values.
1
2
3
4
5
6
7
8
9
10
11
[ScannableMethod]
private void GetQuestState()
{
    var questState = (QuestState)Memory.Deref<int>(
        AddressMap.GetAbsolute("QUEST_DATA_ADDRESS"),
        AddressMap.Get<int[]>("QUEST_STATE_OFFSETS")
    );

    QuestStatus = questState.ToStatus();
    IsInQuest = questState == QuestState.InQuest;
}
The ScannableMethod attribute on top of the method name allows that method to be automatically injected into HunterPie’s ScanManager, the scan manager will run all scannable methods in a background thread every couple milliseconds (this can be configured by the user). It also handles failures and has an internal “circuit-breaker” strategy to remove troublesome scannables if they fail too often.
Handling failures is a mandatory thing, sometimes process pointers are not valid anymore and HunterPie can read garbage values that could cause a crash if not handled correctly.
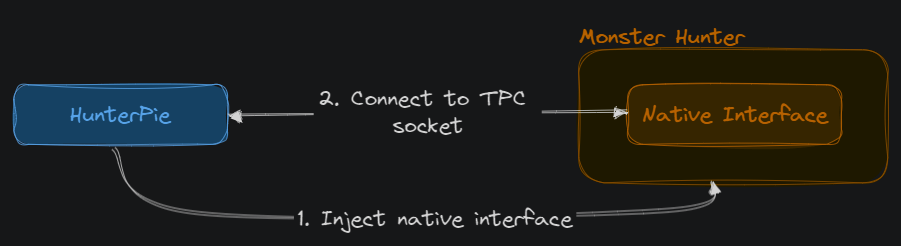
Native Interface
The second value tracking strategy is through a native interface, first HunterPie injects a statically linked library into the game. Once this library is loaded, it automatically opens a TCP socket server that starts listening for incoming connections from HunterPie.
To exchange data between the HunterPie application (made in C#) with HunterPie’s native interface that is injected into the game (made in C++), they use a binary protocol, the messages look like this:
1
2
3
4
5
6
7
8
9
10
11
12
13
14
15
16
17
18
19
20
namespace Core::Server::Models
{
    typedef uint32_t IPCMessageVersion;

    enum IPCMessageType
    {
        INIT_IPC_MEMORY_ADDRESSES,
        INIT_MH_HOOKS,
        GET_HUNT_STATISTICS,
        DELETE_HUNT_STATISTICS,
        CLEAR_HUNT_STATISTICS,
        UNKNOWN
    };

    struct IPCMessage
    {
        IPCMessageType type;
        IPCMessageVersion version;
    };
}
Every message will receive the IPCMessage structure as its first field, allowing HunterPie to call the right MessageHandler based on the IPCMessageType and IPCMessageVersion.
The Overlay
The overlay is one of HunterPie’s main features and is also the most used one, the architecture is very similar to Model View ViewModel (MVVM) pattern but instead of having a “Model”, HunterPie has what I call IContextHandler.
- The Views is responsible for the UI itself, it’s what the user will visualize;
- The ViewModel is responsible to control the data the View will display through data bindings;
- The
IContextHandleris the one responsible to subscribe and handle HunterPie game context’s events. It has direct access to both the View and to the ViewModel it is controlling, but they cannot see theIContextHandler.

This architecture makes it really easy to test how the UI is behaving since we can easily create a mock the IContext and simulate in-game changes.
The overlay is composed by Widgets, each Widget has its own scope and responsibility, you can have the Monster Widget, that is responsible to display Monster’s information, the Damage Meter Widget that displays the damage done by the players in your party, the Abnormalities Widget that tracks and displays your buffs and debuffs timers, and so on.
Every Widget is agnostic to what game you are playing, so it doesn’t matter whether you’re playing Monster Hunter World or Monster Hunter Rise, the Widget components will be reused for both games.
Hunt Exports
Another cool feature, although very recent, is the ability to export hunts. Since HunterPie is constantly tracking in-game information, it is able to track vital information to build a history graph of what happened in your game session.

It displays the party members, their damage over time and the (de)buff uptimes. This is possible because since HunterPie follows an event-based architecture, it can “recreate” what happened in-game based on the order that HunterPie’s internal events were dispatched!
At the end of every hunt, HunterPie will automatically serialize that data and upload it to HunterPie’s backend and link the upload to the user’s account.
Conclusions
HunterPie has been released 4 years ago, the current architecture was very different years ago and is the result to solve solutions I had in the past due to a not well-thought-of architecture. It also took me years to learn things I know now about reverse engineering now, but one thing I can say is that the process of learning all of it was very fun, interesting and changed the way I see software engineering nowadays.